HWID licensing
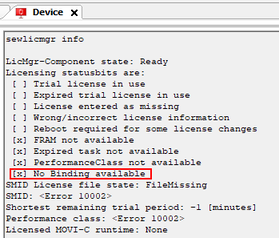
Check licensing
- Open the IEC Editor and establish a communication link between the engineering PC and the visualization device.
- Open the Properties tab of the visualization device by double-clicking the visualization device in the device tree and opening the "PLC Shell" tab which it contains.
- Run the following command via the edit box:
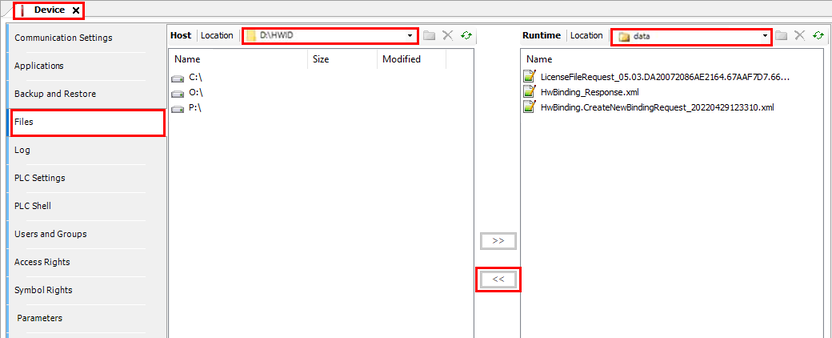
Create a HW binding request file and copy it to the engineering PC
- Run one of the following commands to create a HW binding request file. (You can optionally specify the file name for the HW binding request file during creation. If the required file name is to include spaces, these must be enclosed in quotes.)
- Switch to the "Files" tab.
- Copy the created HW binding request file from the "data" directory on the visualization device to your engineering PC. (This step is not necessary if the visualization device and the engineering PC are the same device)
Create hardware binding file and copy to visualization device
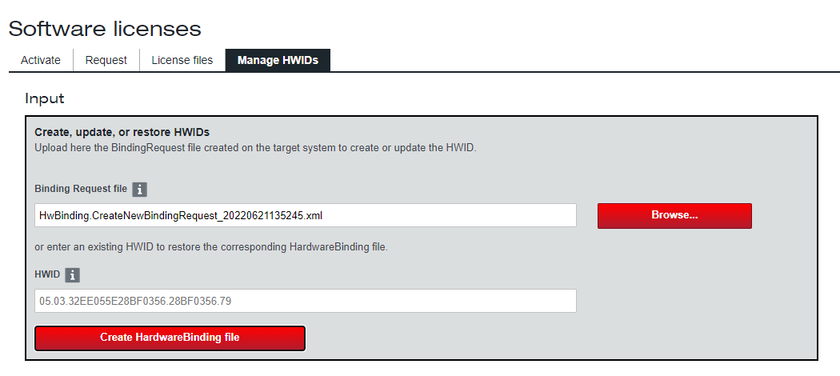
- Open the "Software licenses" page on the engineering PC in SEW‑EURODRIVE Online Support (https://www.sew‑eurodrive.de/os/licensing).
- Switch to the "Manage HWIDs" tab and upload the created HW binding request file via the "BindingRequest file" field.
- Click [Create HardwareBinding file].
- Note down the HWID and download the hardware binding file to your engineering PC via the relevant button.
- Switch to the IEC Editor and copy the downloaded HW binding file to the "data" directory on the visualization device via the "Files" tab.
Install the hardware binding file on your visualization system
- Switch to the "PLC Shell" tab and run the following command to install the HW binding file. INFORMATION: Replace
*.xml with the file name of the downloaded HW binding file.
- Run the following command to check the HW binding:
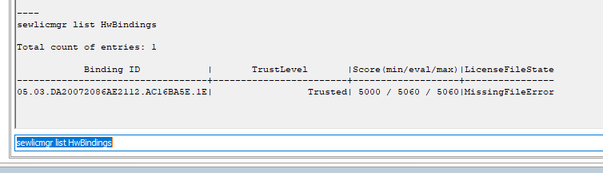
- Run the following command to display a detailed list of the existing HW bindings (SMID/HWID).
- Copy the specified hardware ID ("Binding ID" column).
Activating a license
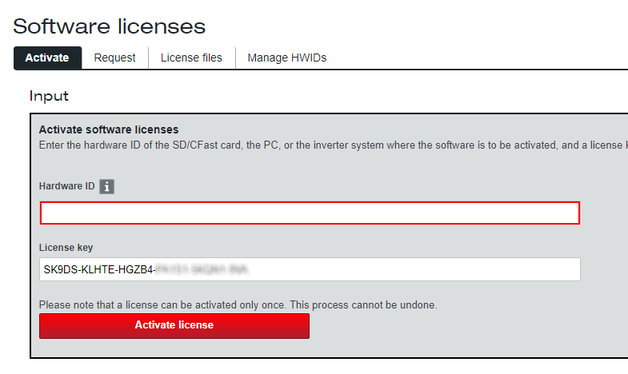
- Open the "Software licenses" page on the engineering PC in SEW‑EURODRIVE Online Support (https://www.sew‑eurodrive.de/os/licensing).
- Enter your HWID and your license key in the "Hardware ID" box in the "Activate" tab and click [Activate license].
- Click [Create license file].
Create license request file and copy to engineering PC
- Switch to the IEC Editor and run one of the following commands in the "PLC Shell" tab to create a license request file for your HWID. INFORMATION: Replace "HWID" with the HWID you have noted. (You can optionally specify the file name for the license request file during creation. If the required file name is to include spaces, these must be enclosed in quotes.)
- Switch to the "Files" tab.
- Copy the created license request file from the "data" directory on the visualization device to your engineering PC. (This step is not necessary if the visualization device and the engineering PC are the same device)
Create license file and load onto controller
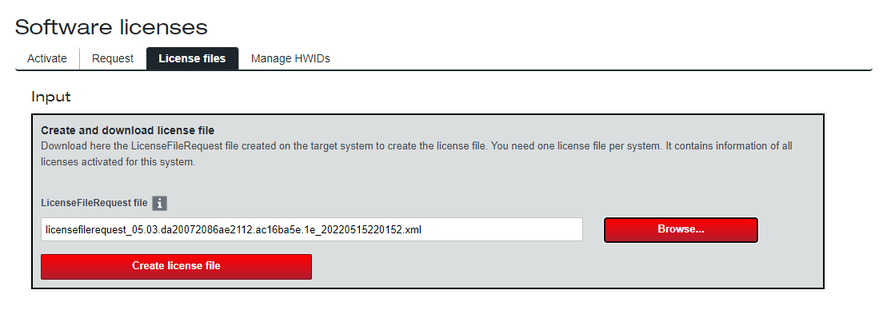
- Switch to the "Software licenses" page again in SEW‑EURODRIVE Online Support (https://www.sew‑eurodrive.de/os/licensing) on the engineering PC.
- Upload the created license request file in the "License files" tab via the "LicenceFileRequest file" field.
- Click [Create license file].
- Download the license file onto your engineering PC using the [Download license file] button.
- Switch to the IEC Editor and copy the downloaded license file to the "data" directory on the visualization device via the "Files" tab.
Install the license file
- Switch to the "PLC Shell" tab and run the following command to install the license file. INFORMATION: Replace
*.sewlicensefile with the file name of the downloaded license file.
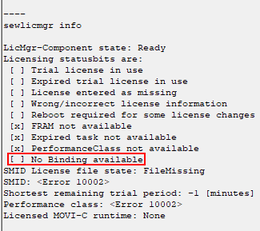
Check licensing
- Run the following command to check the available HW bindings:
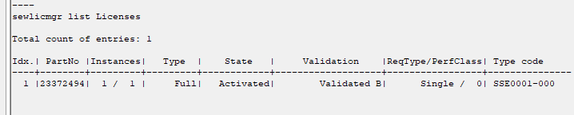
- To check whether the activated license is present, run the following command:
- Switch to the "Log" tab and check the status of the licensing (filter in accordance with "SewVisuLicensee"). See also Checking the license.
Completing licensing
- If an application has already been loaded, restart the visualization or download the Visu application again to exit trial mode.