Creating an endpoint
To add an endpoint, proceed as follows:
- Open the "Endpoints" menu.
- Click [+ Create].
- The "Endpoint configuration" dialog window opens.
- The endpoint can be configured using the following setting fields, which are available for all endpoint types. The specific setting fields for each endpoint type are listed in the following subchapters.
Setting field | Description |
|---|---|
Endpoint configuration | |
Endpoint title | Specify a name for the endpoint. The name is used in the software's configuration menus. |
Endpoint ID (this is generated) | Unique identifier of the endpoint that is generated automatically by the software and used internally for further processing. |
Endpoint type | Select the endpoint type. The relevant fields for the endpoint type are then displayed in the dialog window. |
Comment | If necessary, add a descriptive text to the endpoint. |
File name template | |
Template for the file name | Define a template for generating file names for the stored events. You can use both fixed strings and variables. The available variables are defined on the user interface. Example: |
Options | |
Compress published data as ZIP archive INFORMATION: Available with trial license or stand-alone license only. | Activate or deactivate saving the published data as a ZIP archive. Saving as a ZIP archive saves bandwidth and memory space. |
- Configure the endpoint using the displayed setting fields and then click [Save].
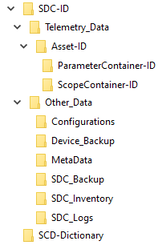
- The following folder structure is created at the storage destination for saving the data:
- The configured endpoint is displayed in the "Endpoints" menu and can be used when configuring data containers.