Creating an endpoint
To add an endpoint, proceed as follows:
- Open the "Endpoints" menu.
- Click [+ Create].
- The "Endpoint configuration" dialog window appears.
- Configure the endpoint using the displayed setting fields and then click [Save].
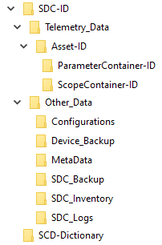
- The following folder structure is created at the storage destination for saving the data.
- The configured endpoint is displayed in the "Endpoints" menu and can be used when configuring containers.

The following setting fields are available for all end point types:
Setting field | Description |
|---|---|
Endpoint configuration | |
Endpoint title | Specify a title for the endpoint. The title is used in the software's configuration menus. |
Endpoint ID (this is generated) | Unique identifier of the endpoint that is generated automatically by the software and used internally for further processing. |
Endpoint type | Select the endpoint type. The relevant fields for the endpoint type are then displayed in the dialog window. |
Comment | If necessary, add a descriptive text to the endpoint. |
Template for file names | |
Template for file name | Define a template for generating the file names of the saved events. You can use both fixed strings and variables. The available variables are defined on the user interface. Example: |
Options | |
Compress published data as ZIP archive | Activate or deactivate saving the published data as a ZIP archive. Saving as a ZIP archive saves bandwidth and memory space. |
Tools | |
Backup app config to endpoint | Initiate a backup of the software configuration on this endpoint, which will be executed immediately. |
The additional setting fields for the different endpoint types are listed in the following subchapters.