Installing the included engineering X4142 connector
SEW‑EURODRIVE supplies the engineering X4142 connector in some cases in an accessory bag (part number: 28273273) with the drive unit. In this case, install the engineering X4142 connector to the connection box of the drive unit as follows:
- It is essential that you observe the startup instructions.
- Switch off the voltage supply and wait for at least 5 minutes.
- Loosen the screws and remove the electronics cover from the connection box.
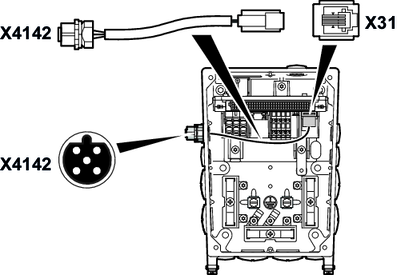
- Plug in the RJ10 connector from outside through one of the permitted cable bushing bores (for the permitted positions, see chapter "Connector positions"). Push the cable completely into the connection box.
- Screw M12 connector into the cable bushing bore. Tighten the nut of the M12 connector (tightening torque: 6 Nm).
- Insert the RJ10 connector into X31 connector in the connection box. The following figure shows an example of the cable routing:
- Plug the electronics cover onto the connection box. Screw on the electronics cover with 4 screws (tightening torque: 6 Nm).